
SoundWater recently added advanced diagnostics to its line of ultrasonic clamp on flowmeters (Cypress and Orcas). This new feature displays various statistics to help customers confirm proper installation or help troubleshoot any issues. Diagnostic metrics are updated in real time so you can work quickly.
In this series of blogs, we will take a closer look at key diagnostic features and how they may be used to get better measurements and troubleshoot installations.
The new diagnostics feature is available only on products with firmware version 3.17+, released Sept 2021. Call us if you would like to upgrade your product.
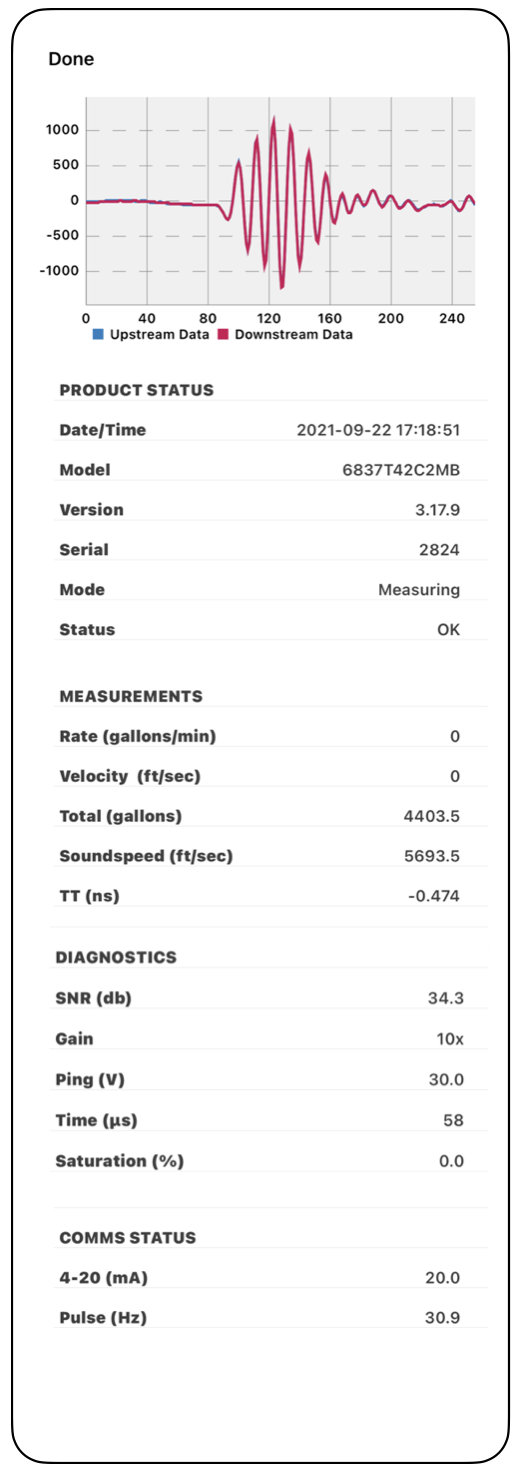
In this first blog, we will be discussing the ultrasound signal plot/chart shown at the top of the diagnostics screen (see top of image to the right).
The chart displays actual ultrasound measurements happening within the flowmeter in real time, and which are used to make the flow measurements. Each signal looks like a small sinusoid or oscillating line. In fact, when the ultrasonic wave hits the flowmeter transducer, it causes a component in the transducer (called a piezoelectric) to oscillate (wobble). The piezoelectric has a unique property in that it creates a voltage proportional to its mechanical deformation, i.e., when it is wobbled by the ultrasound wave it creates a wobbling voltage that the flowmeter can then measure. This is how the flowmeter can detect ultrasound.
From the flowmeter's perspective, the ultrasound appears as a short oscillating voltage, which is what you see at the top of the image shown here. Note that there are two signals, but in the image shown herein the two signals are identical and overlay each other. BUT, when flow starts, you will see the two signals separate from each other proportionally with increased flow rate.
Overtime, you will learn what these signals should look like. The image shown herein is as perfect a signal as you will see. The number of oscillations is small (maybe 5-10 cycles), and the amplitude is large (1000+). If the signal is not present, i.e., it is flat, then you know the flowmeter cannot make a measurement because there is no ultrasound to use.
To get a flow measurement, there must be a usable ultrasound signal. If you see a flat line, then you may consider:
the transducer spacing is incorrect (possibly the ultrasound signal is arriving at a different location on the pipe surface - other than where the transducer is currently located,
the pipe setup is incorrect, and the app is assuming incorrect transducer spacing,
there is insufficient coupling gel between the pipe and transducers,
perhaps the pipe is not full (ultrasound will not pass through air), or
there is heavy internal corrosion blocking ultrasound transfer.
Play around with your flowmeter to learn more about how it works. Move the transducers while watching the plots. What happens when you lift the transducer off the pipe? The signal disappears! Move the transducers farther apart and watch as the signal becomes smaller or deforms.
If you are dealing with seriously small signals, or heavy corrosion, the best way to understand where to install the flowmeter is to watch the signal and leave the flowmeter in the position where the signal is the strongest and cleanest.

What do we mean "cleanest"? Note that ahead of the ultrasound signal shown here (Figure 2, location B), that the line is very flat - this is good! If the signal is not flat ahead of the ultrasound, then there may be potential of unwanted noise (electrical or acoustic) overlapping the 'good' ultrasound (Figure 2, location A). This can be a source of measurement error, so when installing the flowmeter, it is good to look ahead of the ultrasound signal to make sure the noise level is small compared to the signal level.
We have a metric to quantify the level of noise to the level of signal - called the Signal to Noise Ratio (SNR). If you look under the section labeled 'diagnostics' you will see a metric named "SNR". The bigger the SNR value the better - meaning the ultrasound signal is bigger than the noise. Typically, you want the SNR above 15 db, and in fact, the flowmeter will stop measuring flow if the SNR goes below that level.
When you install the flowmeter, take note of the SNR and the noise level ahead of the flowmeter. This will help you get a better install. If the SNR is low, or the noise noticeably high, check your setup, check coupling gel, check the pipe surface for dirt/build up, make sure things are clean. You may also need to move the flowmeter to a better location if the internal pipe surfaces are heavily corroded and causing a low SNR.
Feel free to reach out to us with your questions!
